Interactive development in ITP job instance with component SDK
Using shared job template to create a job instance
A job template is a set of pre-defined parameters for job settings executed in ITP. And shared template is a type of job template which is shared for other users. See reference for more details of ITP.
We provide a shared job template with component sdk. You can follow the steps below to create a job using component sdk.
Create a training job and execute to the step
Configjob.Select
azure ml component and pipeline dev environmentin shared template as Job template.You could add your code below the comment.
Follow the steps of submitting trainning job to create a job instance.
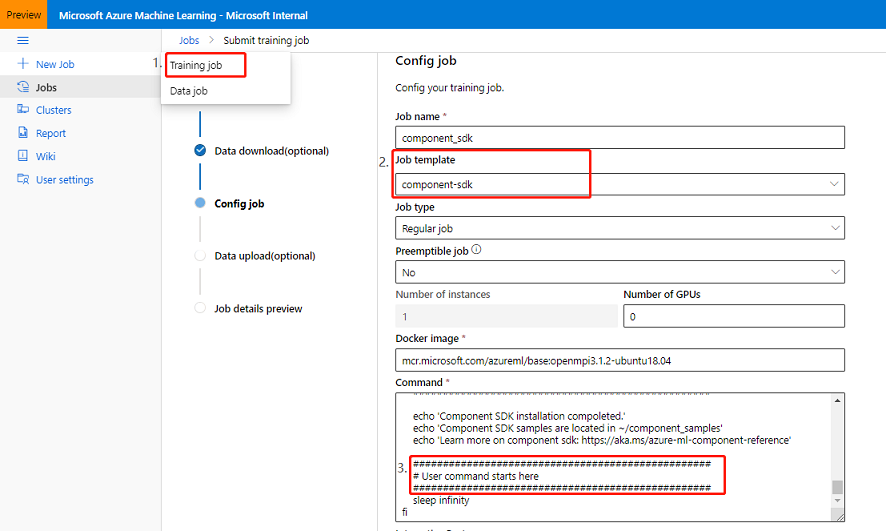
The component sdk installation command may costs 5 mins. If you see this comment in log tab, it means the component sdk installation command is completed.
The stable version of component SDK and component CLI will be installed. The notebooks of SDK samples will be download to $HOME/component_samples. And it will use current workspace to generate $HOME/component_samples/.azureml/config.json, you could directly execute samples in notebook.

NOTE: In order to develop in the job instance created by the shared template, the job instance will be hang after the installation is complete. The status of the job instance keeps running.
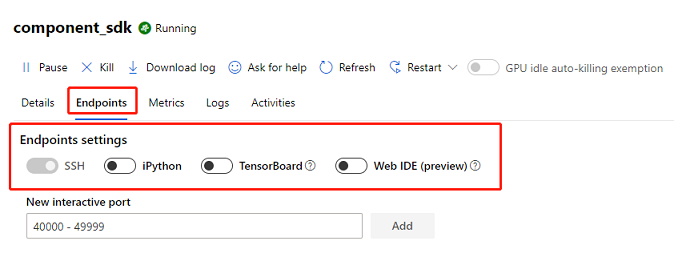
Development in job instance
After creating your job, in the Endpoints tab, it provided some methods to attach to the job instance to develop.
In this section we will introduce some method to develop in job instance, such as Jupyter, VScode by Remote-SSH extension and Web IDE.
NOTE: Since azure sdk will get environment variables as default values, if you want to execute component sdk in another region, you need to execute the following commands before your code.
# In shell
unset "${!AZUREML_ARM@}"
unset AZUREML_SERVICE_ENDPOINT
# In notebook
import os, re
regex = re.compile('^AZUREML_SERVICE_ENDPOINT|^AZUREML_ARM_')
for key in os.environ.keys():
    if re.match(regex, key):
        os.environ.pop(key)
Development in jupyter
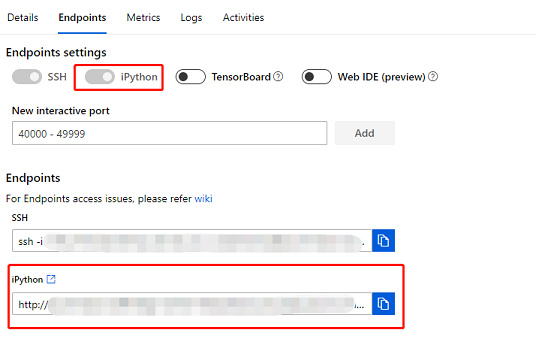
After the component sdk installation command is completed, turn on the iPython of Endpoints settings, it will provide a link to jupyter server. You can develop in job instance through the jupyter notebook.
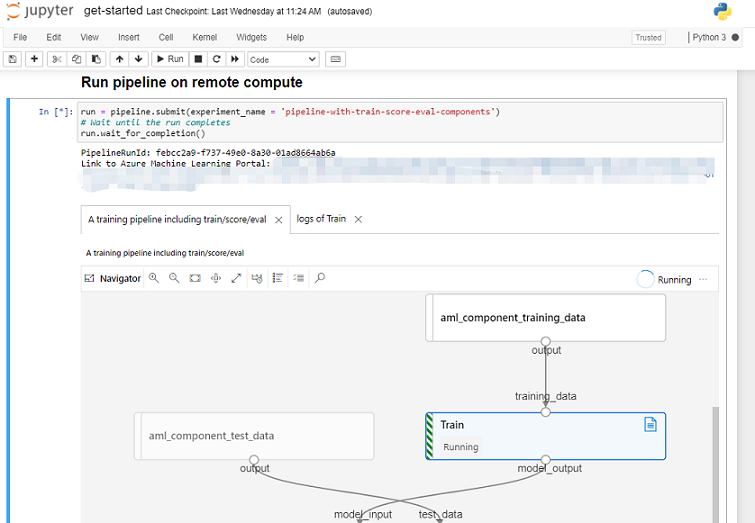
Submit a sample pipeline in jupyter notebook.
Development in VScode by Remote-SSH extension
Follow the steps bellow, you could develop in you local VScode.
Install the extension Remote - SSH in VScode.
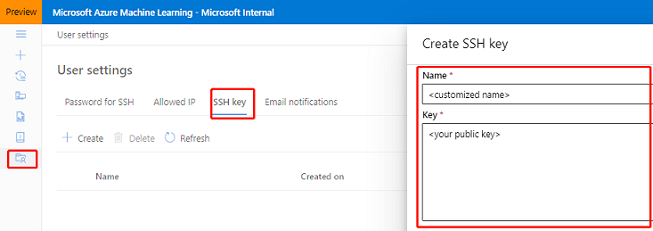
Create SSH public key to ITP portal, see reference for more details.
Generate SSH key pairs by calling
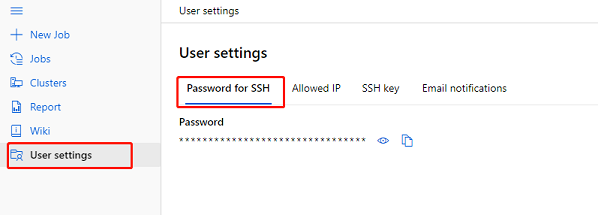
ssh-keygen -t rsain local.Upload the SSH public key to tab
SSH keyof User settings. The uploaded public key will apply to all user-accessible clusters.
Open the switch of
SSHin Endpoints tab.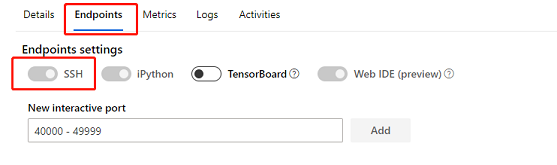
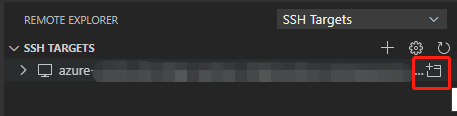
Add ssh connection config to SSH Targets.
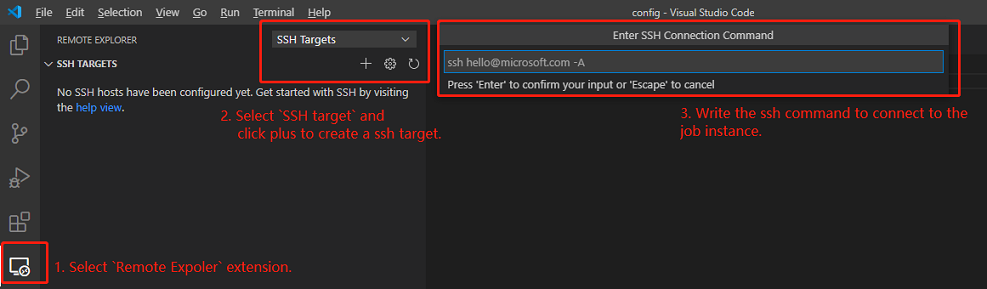
Select
Remote Expolerextension.Select
SSH targetand click plus to create a ssh target.Write ssh command to the text box. You could find the port and hostname in Endpoint tab of the job instance. And you need to replace the path of private key shows in endpoint to the private key in local. SSH connection command is like this:
ssh -i <Path of private key in local> -p <Port> <HostName>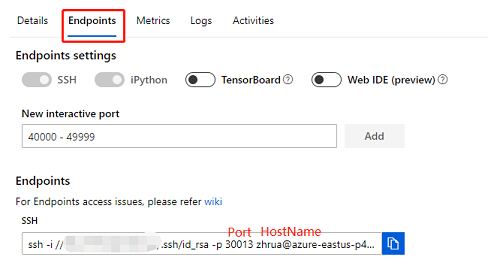
Connect to SSH
After create ssh target, you could find it the Remote Explorer tab and click it to connect in a new window.
If you connect it for the first time, VScode will prompt to select the os type of the host.
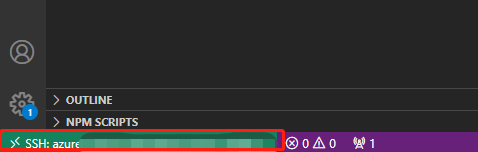
If the status bar of VScode is like this, you could open the workspace in the host and develop in it.
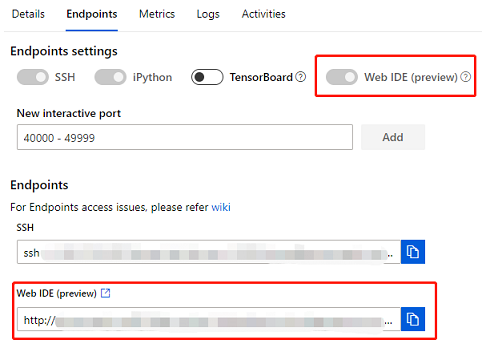
Development in Web IDE(preview)
Turn on the Web IDE of Endpoints settings, it will launch the ide with remote development capability in browser.
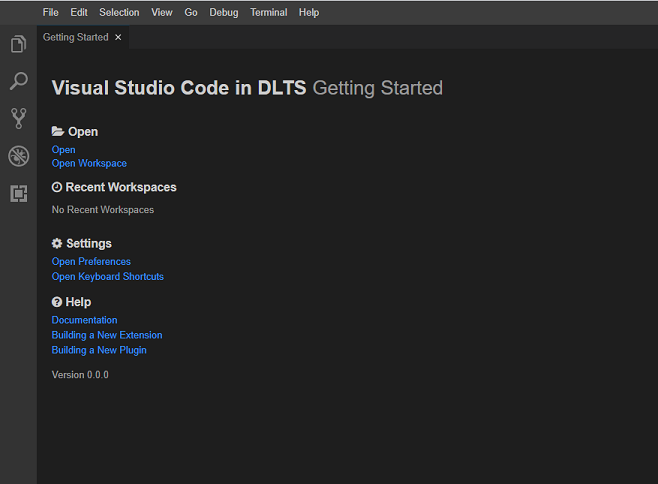
Portal of web IDE.
Connect to job instance through SSH
You can connect to the job instance through SSH. SSH connection command is in Endpoints tab. And you can find SSH password in User settings.
See reference for more details of the SSH connection.
You could get the Pod IP of the job by execute the command hostname -i through SSH.
Create job template with azure-ml-component SDK
In Config job - Template creation section to create either personal template or shared template. See reference for more details of the job template.
Personal template: User is able to create the personal template, which can only be used and managed by template owner.
Shared template: VC admin is able to create a shared template accessible for VC users. Shared template can only be managed by VC admin.
You can follow the steps below to create a job template with azure-ml-component SDK.
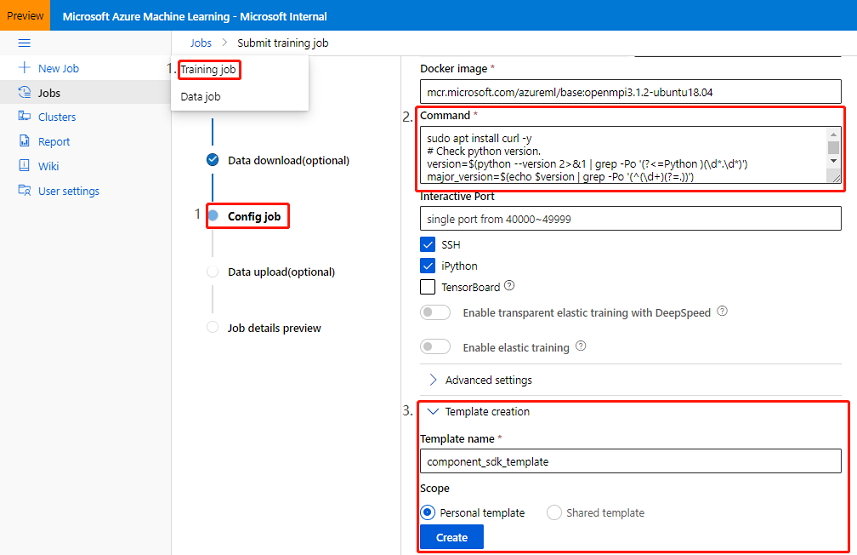
Create a training job and execute to the step
Config job.Add the following azure-ml-component SDK installation commands to
Command. You can use your own image as the base docker image.# If enable 'set -e', when a command exits with a non-zero status, it will exit immediately and job status will be failed. # Otherwise, all commands will be executed and job status will keep running. set -e sudo apt-get update sudo apt install curl -y # Check python version. version=$(python --version 2>&1 | grep -Po '(?<=Python )(\d*.\d*)') major_version=$(echo $version | grep -Po '(^(\d+)(?=.))') minor_version=$(echo $version |grep -Po '(?<=\d\.)\d+') if [ -z "$version" ]; then echo "Cannot find python, please make sure python is installed. " (exit 1) elif ! [ $major_version -ge 3 -a $minor_version -ge 6 ]; then echo "Component sdk required python version >= 3.6" (exit 1) else # Fix NotWritableError when creating conda environment, https://github.com/conda/conda/issues/7267 conda_path=$(which conda | grep '.*(?=/bin/conda)' -Po) sudo mkdir -p $conda_path/pkgs && sudo touch $conda_path/pkgs/urls.txt ################################################## # Install Component SDK (Start) ################################################## pip install --user --force-reinstall pip==20.1.1 pip install ruamel.yaml pip install azureml-dataset-runtime[fuse] "azure-ml-component[notebooks]" --upgrade echo "Component SDK install completed" ################################################## # Install Component SDK (End) ################################################## ################################################## # Install Component CLI (Start) ################################################## PIP_INDEX=https://azuremlsdktestpypi.azureedge.net/modulesdkpreview WHEEL_INDEX=https://azuremlsdktestpypi.blob.core.windows.net/wheels/modulesdkpreview AZURE_CLI_VERSION=$(az --version 2>&1 | grep "azure-cli \s*\K\d.*" -Po) || echo "" if [ -z "$AZURE_CLI_VERSION" ]; then curl -sL https://aka.ms/InstallAzureCLIDeb | sudo bash echo "Azure CLI install completed" fi SDK_VERSION=$(pip show azure-ml-component | grep Version | cut -d' ' -f 2) AZURE_CLI_ML_VERSION=$(az --version 2>&1 | grep "azure-cli-ml \s*\K\d.*" -Po) || echo "" if [ "$SDK_VERSION" != "$AZURE_CLI_ML_VERSION" ]; then az extension remove -n azure-cli-ml | exit 0 cp -R ~/.azure/config ~/.azure/config.bak set_collect_telemetry='collect_telemetry=false' if ! grep -Fxq $set_collect_telemetry ~/.azure/config ; then echo $set_collect_telemetry >> ~/.azure/config fi az extension add --source ${WHEEL_INDEX}/azure_cli_ml-$SDK_VERSION-py3-none-any.whl --pip-extra-index-urls ${PIP_INDEX} --yes --debug cp -R ~/.azure/config.bak ~/.azure/config fi echo "Component CLI install completed" ################################################## # Install Component CLI (End) ################################################## ################################################## # Download Component SDK Samples (Start) ################################################## if [ ! -d ~/component_samples ]; then curl "https://componentsdk.blob.core.windows.net/githubsamples/samples.tar.gz?sp=r&st=2021-05-10T06:19:08Z&se=2026-05-10T14:19:08Z&spr=https&sv=2020-02-10&sr=b&sig=Ap3z1UTUizQwuXenqtccyWzlp3N%2FMw3zoZvpEV0tuzI%3D" -o ~/samples.tar.gz mkdir ~/component_samples tar -xzf ~/samples.tar.gz -C ~/component_samples rm ~/samples.tar.gz mkdir ~/component_samples/.azureml echo {\"subscription_id\": \"$AZUREML_ARM_SUBSCRIPTION\",\"resource_group\": \"$AZUREML_ARM_RESOURCEGROUP\",\"workspace_name\": \"$AZUREML_ARM_WORKSPACE_NAME\"} > ~/component_samples/.azureml/config.json echo "Download Component SDK samples completed" fi ################################################## # Download Component SDK Samples (End) ################################################## # Update ipython config to support tab-completion ipython profile create | exit 0 ipython_config_path="$HOME/.ipython/profile_default/ipython_config.py" use_jedi="c.IPCompleter.use_jedi = False" if [ -f "$ipython_config_path" ]; then if ! grep -Fxq "$use_jedi" $ipython_config_path ; then echo $use_jedi >> $ipython_config_path fi else echo "Cannot create ipython profile, you could add '%config.Completer.use_jedi = False' in your notebook to support tab-completion." fi echo 'Component SDK installation completed.' echo 'Component SDK samples are located in ~/component_samples' echo 'Learn more on component sdk: https://aka.ms/azure-ml-component-reference' ################################################## # User command starts here ################################################## sleep infinity fi
NOTE: Due to an issue with the installation ruamel.yaml package required by azureml-core that happens with pip > 20.1.1, need to pin
pipto version 20.1.1. See reference for more detail.Template creationsection to create personal template or shared template. After template creation completed, you can go toJob templateto find your created shared template.